Cap Frame How-To's
Blog Archive from Designs in Machine Embroidery Volume 104: May/June 2017
Cap embroidery is a popular request from family, friends and customers. But many embroiderers, even multi-needle machine owners, like myself, hesitate when a cap order is requested and with good reason. Caps can be tricky to stitch.The surface is round and typically features a seam in the center of the sewing field. In addition, the sewing field is small so professionally-digitized embroidery designs are crucial for success.
The most popular cap styles to embroider are unstructured and structured baseball caps. Unstructured caps have a soft foldable front (you could easily roll the cap if needed). Structured caps are stiff with heavy buckram interfacing and cannot be rolled easily. Structured caps also do not lay flat in a hoop and require a cap frame designed specifically for multi-needle machines.
Single needle machine owners can easily embroider unstructured
caps with a Magnetic Hoop Clip, Snap Hoop Monster metal base and adhesive tear-away stabilizer.The unstructured cap is flattened on the sticky stabilizer and the bill is held in place by the clip. It’s a good idea to use a basting file around the embroidery design for additional security.
MULTI-NEEDLE MACHINES
Unstructured Baseball Cap
What you’ll need:
- Tear-away stabilizer 3 oz. (heavy)
- Cap frame, drive and jig available through your embroidery machine manufacturer
- Target Sticker
Step 1: Prep the Design
Select the embroidery design for the cap and resize it to fit in the cap frame. The maximum height is 2" for my 6-needle embroidery machine.

My chosen design to embroider.
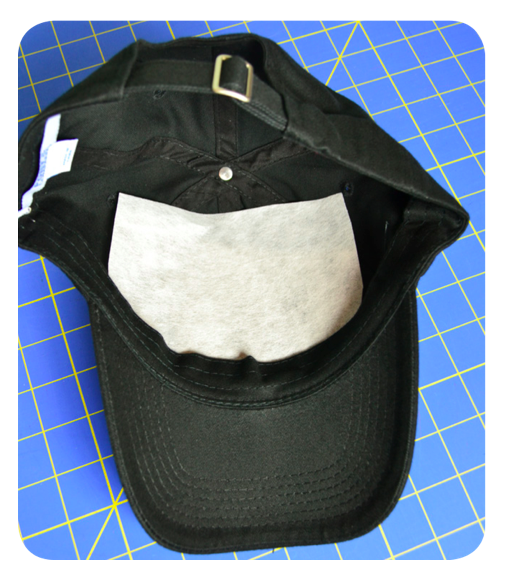
Step 2: Prep the Cap
Cut a piece of stabilizer to fit the front of the cap.
Then, insert it in to the front of cap.

STEP 3: PREP THE FRAME
Follow the manufacturer’s instructions for attaching the driver to the machine. Attach the jig to a solid, steady work surface. Attach the frame to the jig.
Next, slide the cap onto the frame.
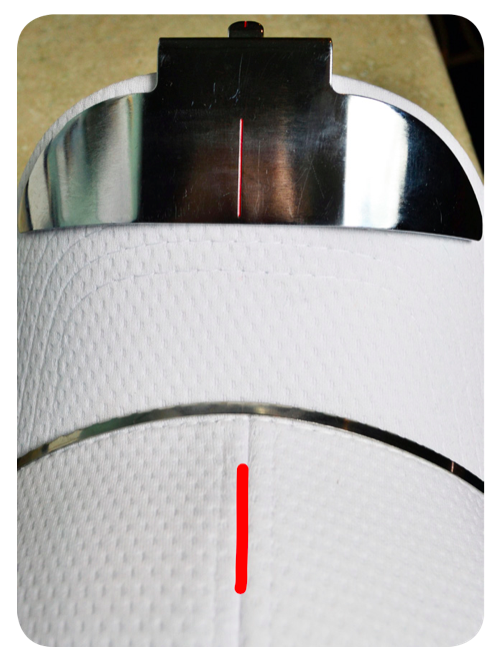
Slip the brim through the frame and insert the brim into the brim protector (the upper latch).
Align the cap’s center seam with the red vertical line on the brim protector. Firmly pull the excess fabric to each side of the frame and use the provided clips to hold it tight.


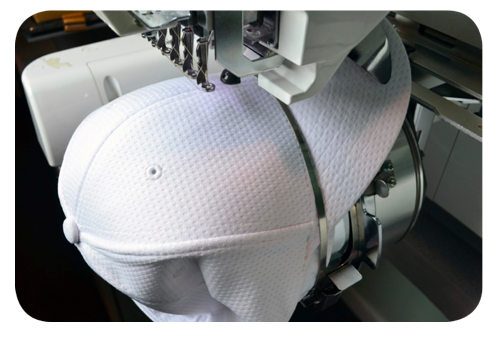
Step 4: Stitch the Design
Remove the frame from the jig and attach it to the driver on the machine.
The embroidery machine will automatically rotate the embroidery design in the correct orientation on the cap. The cap is hooped with the brim towards the back of machine and therefore the design would be upside down when viewed on LED screen.
Align the center seam on cap with the correct needle bar and stitch the design. Remove the hoop and carefully tear the excess stabilizer from inside the cap.
Structured Baseball Cap
What you'll need:
- 1 structured baseball cap
- Cap Frame
Place the cap on the mounted frame, align the center front seam with the red vertical line on top of the brim protector.
* No stabilizer is needed due to the thickness and firmness of the cap. Follow same directions as listed above for the unstructured cap.
Single Needle Machines
UNSTRUCTURED CAP

What you'll need:
- 1 unstructured baseball cap
- Magnetic Hoop Clip
- Snap Hoop Monster
- 4" x 4" Adhesive
- Tear-away stabilizer
- Target sticker
Step 1: Prep the Design
In embroidery editing software, select the embroidery design. Size the design to fit the crown of the cap, normally less than 2 1⁄2" in height. Print a template. Center the template on the center seam of the cap with the bottom of the embroidery design as close to the brim as possible. Slide a target sticker under the template and remove the template.
Step 2: Prep the Hoop
Place adhesive tear-away on the bottom of the Snap Hoop Monster metal frame, sticky side facing up. Attach the Magnetic Hoop Clip on the bottom edge of the metal frame. When placed in this position, there is no chance the embroidery foot will hit the Hoop Clip.

Step 3: Prep the Cap
Working on a flat surface, pull the facing away from the cap so it is not stitched during the embroidery process.
Use tape to keep it from popping back into position. Slide the brim of the cap underneath the clip. Center the brim on the hoop frame. Flatten the unstructured cap onto the sticky tear-away stabilizer.


Step 4: Stitch the Design
Slide the frame carefully on to the embroidery machine attachment. Retrieve the embroidery design and check the orientation. Add the basting outline. Position the needle over the target sticker’s cross hair. My embroidery machine has a laser light beam which perfectly highlights where the needle will touch down.
Just to be sure the embroidery design will land as planned, use the trace feature. During the trace, keep an eye on the foot as it travels along the bottom of the design. You want to make sure it clears the brim. Remove the target sticker and stitch the basting outline.
STEP 5: Complete the design.

STEP 6:
Remove the Snap Hoop Monster frame from machine. Carefully snip the basting stitches from around the embroidery and unclip the cap. Tear excess stabilizer from wrong side of cap.
