Tackling Tubular Items
Blog archive from Designs in Machine Embroidery. Volume 102, January/February 2017
Tubular embroidery machines? "What’s that?" you might ask.
Tubular embroidery machines are commonly known as multi-needle machines. With the advent of the recently-released, single-needle machines, like Brother’s Persona and Baby Lock’s Alliance, the term multi-needle doesn’t really identify these types of machines any longer. Tubular is a more appropriate term because these machines were designed to stitch on finished goods like bags, shirts, sleeves and pant legs.
They are unlike traditional flatbed machines which were designed to sew flat goods and later converted into embroidery machines.
For the past year and a half, I have written the Multi-Needle Monday posts on Eileen’s Machine Embroidery blog. We’ve learned that more and more people are embracing the ease and functionality of owning a multi-needle machine. Initially, many fear threading the machine until they then learn to use it to its full potential.
In future articles, I will discuss a variety of subjects pertaining to the tubular embroidery machines in detail. I hope you enjoy the column and even if you do not own a multi-needle embroidery machine at this time, you might consider purchasing one in the future.
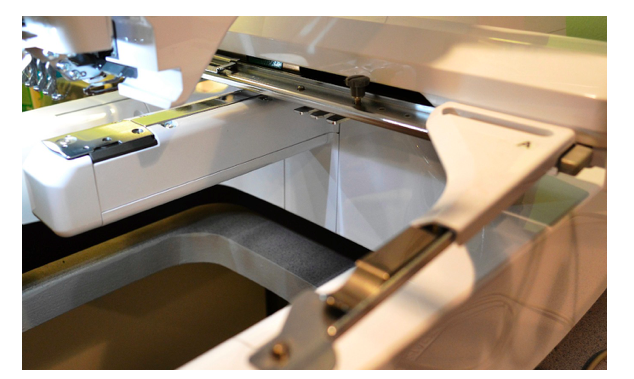
One of the main differences between a single needle embroidery machine and a multi- needle embroidery machine is the point of attachment of the hoop to the machine. The multi- needle hoops are attached at two side "arms" which give the hoop better support. This added support enables the embroiderer to hoop heavier fabrics without the fear of it popping out of the hoop. The tubular ability also makes hooping t-shirts, bags, pockets, pant legs and sleeves much easier than a single machine. The tubular term translates into the ability to slide a garment or other product over the "cylinder" free arm of the machine. Read on for step by step procedures for hooping the following popular tubular items such as: t-shirt, tote bag pocket and jacket sleeve.
Left Chest Placement T-shirt
What you’ll need:
- Hoop: Standard 4" x 4" embroidery hoop
- Embroiderer’s Helper (DIME product)
- target sticker
- Poly mesh fusible cut away stabilizer
- water soluble stabilizer
Let’s Get Started!

Turn the t-shirt right side out and iron the fusible poly mesh stabilizer to the wrong side of the shirt in the upper left chest area. Cut a piece of stabilizer large enough (8" x 8") to easily cover the area that will be embroidered.
Cut away stabilizer should always be used when embroidering knit fabric. If the embroidery design is very dense, you can use two layers of stabilizer. Fuse only one layer and float a section of tear-away under the hoop.
Turn the shirt right side out and fold in half lengthwise. Place the Embroiderer’s Helper along the folded edge of t-shirt; lining up the neckline with the curved edge on the tool. Insert a target sticker into the side slot according to the size of t-shirt.

Precisely place the target sticker with the cross hair straight and the arrow on target sticker pointing to the top of t-shirt.
Slide the bottom frame of the embroidery hoop inside the t-shirt and attach the top frame when centered over the target sticker.
Do not over stretch the fabric; this will cause the fabric to pucker after it’s removed from the hoop. I always pick up the hoop and turn it over checking for excess fabric that could be caught in the hoop and that the stabilizer is completely covering the hooped surface.

Slide the embroidery hoop onto the machine at side attachments and through the neckline opening. Make sure the two side metal handles of the hoop are "clicked into the grooves. Feel underneath the hoop to determine if a sleeve or bottom of t-shirt is caught under the hoop.
Align the embroidery design with the target sticker’s crosshair. Use the jog keys to adjust the hoop as needed. After placement is verified, remove the target sticker and add a piece of water soluble stabilizer on top of the fabric. Stitch the design.
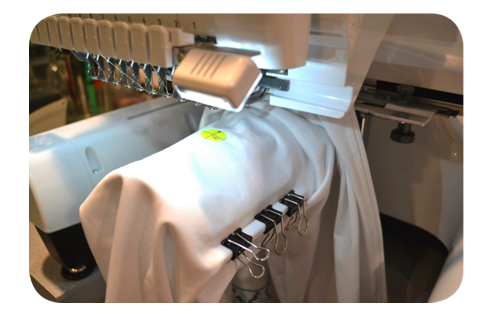
Upper Sleeve Embroidery on Jacket
Hoop: Standard embroidery hoop (40mm x 60mm)
What you’ll need:
- 1 full zip jacket or other style
- Cut away poly mesh stabilizer or fusible poly mesh
Decide on the placement of the embroidery design. For best results have the wearer put the jacket on and place a target sticker in the desired location. In my business

I do not have the opportunity to have customers try on every garment. The best solution is
to measure down from the top shoulder seam approximately 6 or 7" along the fold. Place a target sticker on the sleeve.
Carefully slide the bottom frame into the sleeve area along with the stabilizer. Attach the top frame of the hoop and make sure the target sticker is centered and straight as possible. When using a very small hoop, you will have less area to adjust the embroidery design. Precise placement is crucial. Always flip the hoop over and check for excess fabric under
the hoop. Attach the hoop to the machine with the upper portion of jacket towards the body of the machine.


The sleeve is actually slid over the bobbin throat area. Align the needle with the arrow on crosshair and remove target sticker when in position.
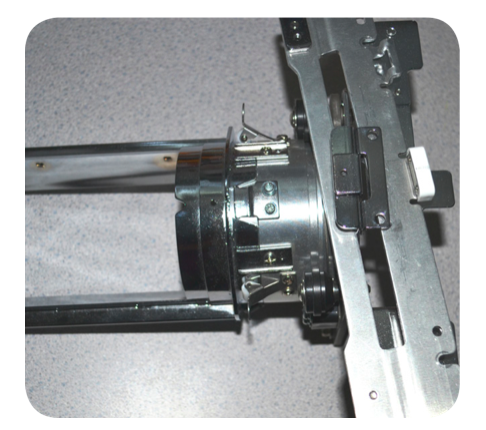
Option 2: Cylinder Hoop
One of the best attributes of the cylinder hoop is the generous embroidery area: 3" tall x 3.5" wide. It is a useful tool for stitching the upper sleeve on a jacket. The hoop is curved and the use of stabilizer is very critical because of the "open window" frame.
I suggest using the fusible cutaway stabilizer when stitching a fabric with stretch. Clips are necessary to hold the fabric in place and inserting the frame to the machine needs a steady hand so as not to push the fabric through the frame opening.
The embroidery machine will "read" the hoop which is helpful but consider if the design needs to be rotated.

There are three different components of the cylinder hoop: the mounting jig, the cylinder driver and cylinder hoop frame. Let’s prepare the machine first. Loosen and remove the screws from the back of machine attachment and remove the "A" or "B" arms, place the screws aside. Insert the cylinder driver on to machine where the arms were removed and tighten the bottom screws (included with the cylinder hoop) as well as inserting the screws from the arms that were removed.)
Attach the cylinder mounting jig to a table top or metal stand frame and tighten the bottom screw vice which is included with the mounting jig.

Mark the embroidery area on the jacket sleeve with a target sticker; turn the sleeve inside out and iron the fusible stabilizer to the inside
of the upper sleeve. Turn the sleeve right side out with the target sticker still in place. Insert the cylinder frame onto the mounting jig and slide the sleeve onto the frame. Use the included clips to tighten the fabric on the frame on both sides.
Remove the frame from the jig carefully and transfer to the cylinder driver.

Embroider the design on upper sleeve area of jacket and remove frame from driver. Remove all clips and re-iron the fusible stabilizer from inside jacket sleeve. Carefully trim the excess stabilizer from inside jacket and clip the thread tails if necessary.